
Are you ready to learn how to create your very own Shopify store?
You may have just come up with a great product idea and now you would like to see if people are willing to buy it.
It used to take many hours to create an eCommerce store as well as a lot of know-how. You can hire a Shopify development company who is specialized in product descriptions, email marketing, Shopify themes, and more. However, today everything has changed and it only takes a few minutes to create an online store. Merely with some click and some typing, anyone can set up the eCommerce website on the Internet.
There’s a reason why Shopify is such a popular platform. Perhaps, the biggest reason is that building your first online store has never been easier.
Whether you are selling jewelry as a hobby, setting up drop shipping, or creating an online counterpart for your regular store, Shopify can work for you. It provides everything you need to start an online store, and you can set it all up in less than an hour.
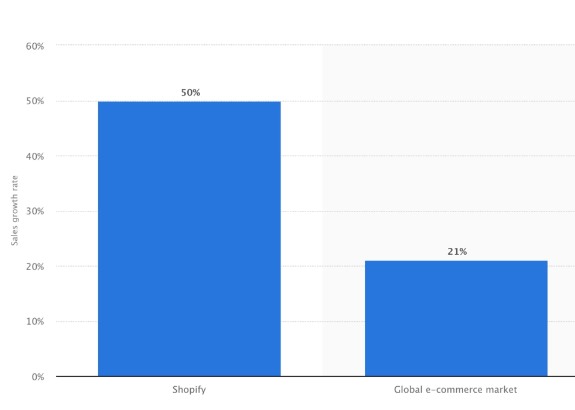
According to the statistics:
- Shopify is a highly recommended eCommerce platform holding 20 percent of the market share.
- The percentage of users who have purchased from Shopify merchants has increased by 52% from 2019 to 2020.
- There is a boost in the total revenue on yearly basis by 47%.
- Shopify Businesses has noticed a 50% increase in online sales by 2019, then 21% by Global E-Commerce Market.
What is Shopify and how does it Work?
Shopify is arguably one of the most well-known brands in the eCommerce world. But not everyone knows what this platform is or how it works.
Simply put, Shopify is software that you pay for using the SaaS model. In other words, you sign up for a service. Usually, if you pay for annual support straight away, you will benefit from a slightly reduced cost.
Shopify eCommerce owners and sellers can build a website and use the built-in shopping cart solution to sell both digital and physical products to customers around the world.
Also, Shopify has a system that enables the customers to handle things easily and quickly such as tracking inventory and shipping needs. With Shopify, you can access a modern dashboard where you can see the products you have for sale, write descriptions, process orders, and more.
How to Design Shopify Store: Step-by-Step Guide
Step 1: Sign up for Shopify
The first step in setting up your Shopify store is also the easiest. In order to start using Shopify, all you need to do is sign up.
Go to the Shopify website, and click the Get Started button. Enter your desired email address, password, and store name.
Remember, you will need to choose a unique name for your store, otherwise, Shopify will not let you buy a domain.
After you click Next, tell Shopify about yourself by specifying how much you plan to sell and if you are already selling. Click on the Enter My Store button when done.
Shopify will then ask you if you want to make a brick-and-mortar store or an online store. Choose the option and click Next.
The next page prompts you to fill in personal information such as your name, address, and phone number, all of which are used to set up currencies and tax rates.
Step 2: Add the Product to your Shopify Store
Once you sign up correctly with Shopify, the software will take you straight to the admin screen of your new website. Here, the customization and uploading of products can be started.Concluding Remarks
When you navigate to your Shopify backend, there is a nice step-by-step process for completely setting up your store. The first button asks you to add a product, so you need to click on it first.
The “Add Product” web page is the same as the WordPress website. You can fill in details like title, description, price, and supplier. Feel free to fill out most of the product pages you want..
Remember that images connected to your product can increase or decrease your chances of selling, so it makes sense to choose images that will appeal to your target audience. Don’t make the mistake of overlooking the importance of your website’s visuals.
Step 3: Customize the Look and Feel of your Shopify Website
Return to the main toolbar and select the “Customize the look of your site” button. This area suggests customizing anything from logos to colors. It takes a little time, but the main part you want to focus on is the link that asks you to visit the theme store.
Here you can browse hundreds of themes in Shopify to make your website look amazing. While free themes are great, premium themes can be very attractive.
Premium themes will come with additional modifications, so if you want to dive into the finer details of how your website looks, it might be a good idea to pay a little extra for a professional theme. You will also find that you can make a lot of adjustments to the way your site looks and works if you gain access to the CSS and HTML aspects of the theme. If you don’t have a coding expert, you can always check the Shopify experts page for more help.
Some things you can change in your Shopify Theme:
- Fonts
- Color Schemes
- Elements that appear on the page
- Linked item functionality
- Home Page Slide Carousel
- Logos
Step 4: Set up your Domain with Shopify
When selecting the design and template as per your preference, it is time to pick the domain to create the website live and official.
Move back to the dashboard; then, select the location that demands to include the domain. This will ask you if you want to transfer the domain or register a new one. Choose the domain you like and follow the steps to complete your purchase. You also need to specify which Shopify Payment game you would like to go with.
Remember, you can buy a domain from Shopify and add it directly to your store, or you can buy a domain name elsewhere and add it to Shopify – it’s entirely up to you. However, you will need to update your DNS records if you load an existing name.
Upon activation, you can go to that specific domain and view your website. While you’re in the main area of your Shopify website, make sure the following information is complete:
- General: Save all your information in the settings area, including billing information and legal information.
- Taxes: Make sure there is a “collect taxes” checkbox under the “Options” section of your website to help you with accounting.
- Delivery: You will need to click on the “Required Delivery” option next to the products so you know which products need an additional postage and packaging price increase. Be sure to choose either a weight-based shipping specification or one that helps you sell as many products as possible.
You can also test your ordering system before moving on to selling online by going to the Shopify admin section, clicking on Settings, and going to your payments settings. In the Payments section, turn it off before proceeding, then select the credit card gateway to check. You can click Bogus Gateway to test and then place your order as if you were a regular customer.
Step 5: Activate your Payment Processor
Concluding RemarksConcluding RemarksClick on the tab to the left of the toolbar called Payments. From the area, you can pick several payment gateways like Authorize.Net, Stripe, and PayPal. Shopify also has a payment processor that is very easy to implement. Just walk through the steps to activate your payment processor. This allows you to accept payments and post those payments to your account.
Below are some of the most important things that you should consider when setting up a Shopify store. Remember, the gateway that’s right for you will depend on many different things, including:
- Transaction Fees: Most payment gateways charge a small fee every time someone buys something on your site. Make sure you go for the gateway that gives you the lowest price.
- Card Types: It’s important to choose a payment gateway that accepts a wide variety of card types and other payment methods, including the likes of PayPal and Stripe.
- Outbound Checkout: Some payment gateways will take the checkout process from your website to their own server using a form. This payment gateway strategy might be a little more secure, but it’s also a little painful for customers.
After all is said and done, you can click the Launch Website button to make the store live. Congratulations! You now have a fully functional Shopify online store.
What to Sell on Shopify Store?
Most people may be wondering if there are any restrictions on selling on Shopify? Yes, each platform has its prohibited products for sale, but this most of all depend on the target country in which you want to sell.
Shopify lets you sell products in full categories, including apparel, electronic products and accessories, toys, home and garden products, sporting goods, shoes, home decor, health and beauty products, and more.
Concluding Remarks
The article was all about creating the Shopify store. A roadmap is given to show you how to do it. Now, it’s your turn to take action!
If you fail to attain the goal the first time then, try it again and again until you achieve it!
We hope that this article has given you the desired knowledge.If you are stuck somewhere or have any queries, then, ask us in the comment section below. We are here to assist you!
Thanks for reading!
About – Morris Edwards is a Manager at Awebstar, which is dealing with web design & development, mobile app development, SEO, social media marketing and more.
