
In home improvement, the allure of a “Do It Yourself” (DIY) project can often lead homeowners down a path fraught with unforeseen challenges and complications. One such endeavor that has caught the eye of ambitious DIYers is mudjacking—a method traditionally used for lifting and leveling concrete slabs. While the appeal of taking matters into one’s own hands is understandable, the complexities and potential pitfalls of DIY mudjacking cannot be overstated.
This blog post explores why DIY mudjacking may seem attractive but ultimately reveals why it is ill-advised. Mudjacking requires specialized tools, experience, and expertise that lie beyond the realm of even the most determined DIY enthusiast. Furthermore, we will discuss why, in today’s world, polyjacking has emerged as the superior technique, offering a more durable and effective solution for addressing sunken concrete—and one that unequivocally necessitates the skill set of a professional. Join us as we unpack why entrusting this task to experts is not only a matter of convenience but a critical decision for ensuring the safety and longevity of your property.
While some homeowners may consider DIY mudjacking for smaller projects, the challenges and risks associated with it often outweigh the perceived savings. In particular, slabjacking offers a more precise approach compared to traditional mudjacking methods, especially when handled by skilled professionals.
What Is Mudjacking?
Mudjacking is a process used to repair uneven or sunken concrete surfaces. This technique can be applied to various structures, including sidewalks, driveways, patios, pool decks, and even building foundations. The method involves drilling small holes into the affected area and pumping a slurry of cement, soil, and water into the voids beneath the concrete. This mixture then hardens and lifts the concrete.
Mudjacking has been used for years to repair uneven, sunken concrete surfaces. You could say it’s the old-school way of lifting and leveling concrete. One benefit of mudjacking is that it is a cost-effective alternative to concrete replacement. However, mudjacking is not today’s go-to option for lifting and leveling uneven concrete. Today, that go-to option is polyjacking, which we’ll talk more about in just a bit.
Problems With DIY Mudjacking
As we hinted above, mudjacking is an outdated method of lifting and leveling uneven concrete slabs. This method involves pumping a slurry mixture of water, cement, and sand under the sunken slab to lift it back into place. However, as noted above, mudjacking is not commonly used anymore due to its many drawbacks, including the following:
- It’s messy – One major issue with mudjacking is its messy process. The slurry mixture is challenging to handle, which can result in an untidy job site.
- The slurry needs to dry and cure – The cement slurry used in mudjacking takes time to dry and cure, which can cause inconvenience and delay in repairing the slab. It can take several days for the slurry to dry completely, which can be a hassle for homeowners who need a quick solution.
- The cement slurry is heavy—The slurry used in mudjacking weighs a lot, which can be problematic if the soil under the slab is weak. The added weight of the slurry may only worsen the problem and cause the slab to sink further, which can result in further damage to the slab.
- Mudjacking is a temporary fix – Another significant disadvantage of mudjacking is that it is a temporary solution. The slurry can wash away over time, leaving the slab susceptible to sinking again. This means you may have to repeat the process of mudjacking multiple times, which can be expensive and time-consuming.
Note that all of the above apply both to DIY mudjacking and mudjacking performed by a professional contractor.
Polyjacking Is Better Than Mudjacking
What Is Polyjacking?
Polyjacking—also known as polyurethane foam injection—is a term for a process that involves injecting high-density polyurethane foam into the soil beneath a sinking concrete slab to lift and stabilize it. Foundation repair contractors commonly employ this technique as a more efficient and cost-effective alternative to traditional methods such as mudjacking or concrete replacement.
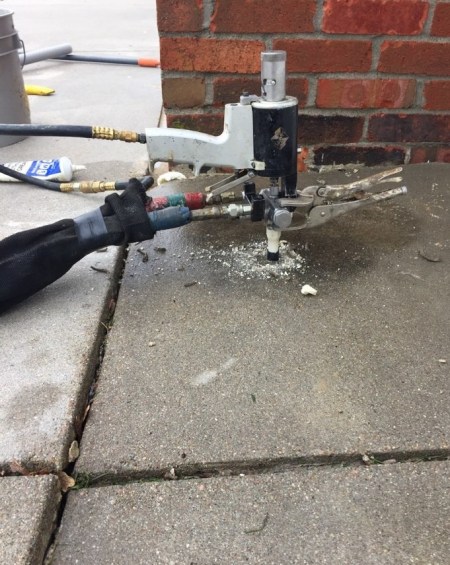
Polyjacking involves drilling small holes into the concrete and injecting a special polyurethane foam mixture into the soil through these holes. The foam mixture expands and hardens, creating a solid, stable base beneath the foundation. This process effectively lifts and levels the foundation, correcting any sinking or settling issues.
Injecting polyurethane foam offers several advantages over mudjacking, making it the preferred choice for concrete leveling. Unlike mudjacking, which relies on a heavy slurry mixture that can add unnecessary weight to the soil, polyurethane foam is lightweight and does not burden the underlying ground.
Why Is Polyjacking Better Than Mudjacking?
There are several reasons why polyjacking is considered superior to mudjacking:
- The foam is lightweight – Polyurethane foam is much lighter than the cement-based slurry used in mudjacking. This means that less weight is added to the soil, reducing the risk of further soil compaction and settling.
- Polyjacking is faster than mudjacking – Polyjacking is a quick process that can usually be completed in a few hours, depending on the size and complexity of the project. Mudjacking can take days to complete because the cement slurry used needs time to dry and harden.
- Polyjacking foam lasts – Polyjacking foam is waterproof and durable, so it won’t disintegrate and wash away. The foam also won’t crumble or erode over time due to changes in temperature and moisture levels.
- Polyjacking is a more precise and efficient process – Polyjacking allows for better control over the amount and location of the injection, resulting in a more accurate and uniform lift.
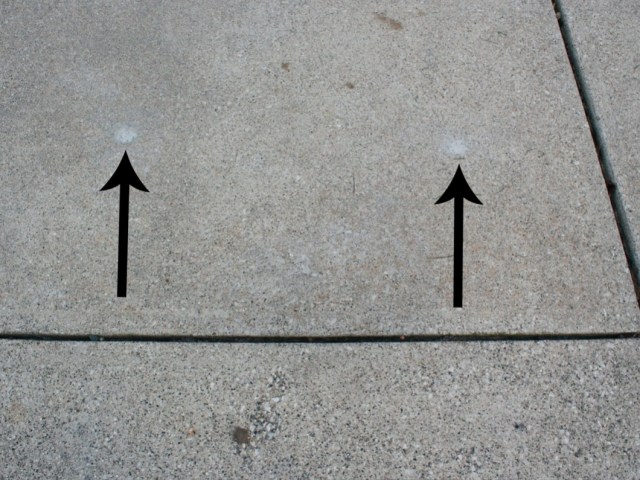
- Polyjacking is a less visible repair – This is because the holes used to inject the foam under the slab are dime-sized and smaller than those used for mudjacking.
- Polyjacking is more environmentally friendly – The foam used in polyjacking won’t leach harmful chemicals or pollutants into the soil. It also requires less energy and resources to manufacture and transport than cement-based materials.
For more information, see Mudjacking vs Polylevel For Leveling Concrete Slabs.
The Polyjacking Process
- Inspection and preparation of the site – The first step in the polyjacking process is to inspect the affected slab and determine the extent of the damage. The contractor will look for signs of erosion, cracks, and voids underneath the slab. They will then clean the area and prepare it for the injection process.
- Drilling holes – Next, the technicians will drill small holes in the slab where the polyurethane foam will be injected. The number of holes depends on the size and location of the slab.
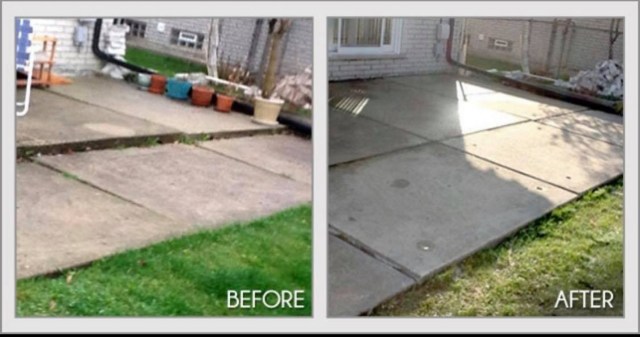
- Injection of the foam – Once the holes are drilled, the professionals inject the polyurethane foam into them. The foam expands rapidly and fills the voids underneath the slab, raising it back to its original position.
- Monitoring and finishing – After the foam is injected, the technicians will monitor the slab and adjust the foam as needed to ensure that the slab is level. They will then patch the holes with concrete to finish the repair.
- Leveled slab ready for use – The slab is ready for use again around 15 minutes after the repair is complete.
Don’t leave the stability and longevity of your concrete to chance. Instead, ensure it’s done right by contacting a professional contractor who specializes in polyjacking. Not only is it a more effective solution than DIY mudjacking, but it also provides lasting results with minimal disruption.