
Most storage spaces are burdened with duplicate files and junk files, consuming valuable storage unnecessarily. This issue becomes especially problematic when utilizing cloud storage, where limited space poses a significant challenge.
Duplicate files not only occupy substantial storage on our computers but also hinder efficient use of that space. Manually identifying and deleting duplicate files is a time-consuming and labour-intensive process. It involves searching for files, opening them, comparing their contents, and finally deleting duplicates.
To recover disk space in Windows, eliminating junk files is another effective strategy. The removal of junk files contributes significantly to freeing up storage space on your computer.
Deleting duplicate files not only enhances your computer’s performance but also simplifies file retrieval by eliminating unnecessary clutter. Rather than engaging in manual removal, several duplicate finder and remover programs available on the internet offer quick and efficient solutions. Various programs cater to different needs, ensuring easy and rapid removal of duplicate files.
For swift removal of duplicate files, third-party duplicate photo remover tools are also available, easing the process and optimizing your storage space.
Uninstall installed programs:
Numerous programs are installed on the computer, consuming a significant amount of valuable storage space. You can directly uninstall these programs from the system settings. To remove installed applications, access the control panel through the settings menu. Within the control panel, you will find a comprehensive list of all the applications installed on your computer, allowing you to remove them individually.
Delete unwanted and old files from your computer:
There are lots of redundant and old files left on the computer. There can be old setup files that are old versions of the program that can easily be deleted, and it will help you free up storage on my computer.
Also, many times, it happens that we download some files from the internet and then forget about them after using them. These types of files can be deleted to recover disk space on the computer.
You can sort the files according to time and then remove them after selecting the files that are old and of no use.
Emptying the Recycle Bin
It’s common knowledge that the “recycle bin” holds deleted files from the computer, and if the files reside there, they are potential candidates for deletion. However, if there are files you wish to restore, you can easily recover them. On the other hand, if the files are unnecessary, deleting them poses no issue and can significantly reclaim space on your computer.
Unwanted files can also be directly removed from your computer without sending them to the recycle bin. By pressing the Shift button and then hitting the delete key, you can permanently remove files from your computer. This will help you directly recover disk space on Windows.
Removing Temporary Files
Deleting temporary files from your computer can free up a substantial amount of space, enhancing the overall performance of your device. Temporary files, being essentially useless, can be manually cleared or automatically cleared through the use of Storage Sense.
For manual removal of junk files, open the Run dialog and type %temp%. This action opens a temporary folder housing all the unnecessary files. You can then select all the folders and files within this temporary folder and proceed to delete them.
Use Disk Cleanup to remove the remaining junk files
A notable feature of Windows is its disk cleanup tool, which offers an efficient and quick method to rid your Windows 10 system of unnecessary files. This Disk Cleanup functionality provides a straightforward means to clean up various types of junk files, including those from the Recycle Bin, outdated software installations, thumbnails, temporary files, and more, on your Windows 10 computer.
To use Disk Clean-up, follow the steps below:
You have to look for the Disk Clean-up program in the Windows search bar. Click on Disk Cleanup or press enter to open Disk Cleanup.
By default, system drive C: will be selected, but you can select other drives on your computer as well.
- Click on the OK button to start the scan.
- Wait while Disk Cleanup calculates the amount of space that can be recovered.
- Select the checkboxes next to the types of files you want to delete.
Make sure that you are selecting files that you know you can remove without any problem. Avoid selecting any Windows files or files you do not know about.
Also, make sure that you aren’t selecting any Windows ESD installation files, as they are used in restoring the computer to its factory settings.
- In some sections, you can select to view files.
- Click on the OK button to delete the junk files.
- Now click on the Delete Files button to permanently remove the junk files.
Recover more valuable space
Apart from manually recovering space on the computer,. You can also use a duplicate photo remover program to remove the duplicate photos and recover valuable space on the computer.
Let’s have a look at the Duplicate Photos Fixer Pro program that we can use to remove duplicate pictures from our computer and recover valuable space on the computer.
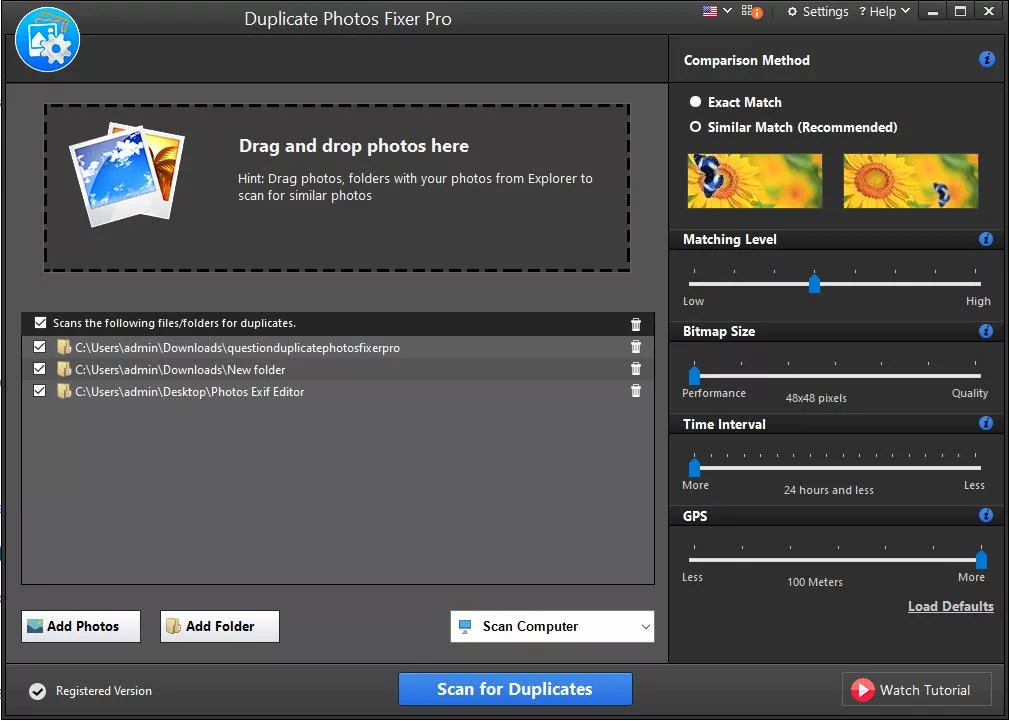
Duplicate Photos Fixer Pro:
Duplicate Photos Fixer Pro is a straightforward and user-friendly program designed to find and remove duplicate photos. It efficiently eliminates duplicate photos from internal storage, external storage, network storage, and Google Drive.
Duplicate Photos Fixer is compatible with Mac, Windows, Android, and iOS devices, allowing you to eradicate duplicates across all your platforms.
Advantages
- Swift scanning and deletion speed.
- User-friendly with a simple interface.
- Preview duplicates before deletion.
- Automatic marking and effortless deletion of duplicates.
- It supports multiple operating systems: Windows, Mac, iOS, & Android.
Let’s explore the steps for using the program:
Employing duplicate photos is a straightforward process due to its user-friendly interface, which facilitates the detection and removal of duplicates.
- Initially, download and install Duplicate Photos Fixer Pro from the following link:
- Next, click on the “Add folder” button and include the location you wish to scan.
- After adding the location, initiate the scan by clicking on the “Scan for Duplicates” button. Alternatively, you can drag and drop the location for scanning.
- Once the scan is complete, all the identified duplicates will be displayed. If there are only a few duplicates, you can manually mark them. However, for a larger number of duplicates, utilize the Auto Mark functionality.
- After marking the duplicates, you can easily delete them.
That concludes the process, and the duplicates will be removed from your computer.
Final Verdict
There are lots of ways that you can restore storage on my computer. Space on the computer can be recovered by removing temporary files, junk files, duplicate files, old downloaded files, and other redundant files. You can manually remove the junk and other files to recover valuable space on the computer, but removing the duplicate photos takes lots of time and effort.
To remove duplicate photos, you can use Duplicate Photos Fixer. It is one of the best duplicate photo removal programs. It will help you remove duplicate images with a single click. You can easily use the program to recover occupied space on your computer.